/* Create a new sds string with the content specified by the 'init' pointer * and 'initlen'. * If NULL is used for 'init' the string is initialized with zero bytes. * If SDS_NOINIT is used, the buffer is left uninitialized; * * The string is always null-terminated (all the sds strings are, always) so * even if you create an sds string with: * * mystring = sdsnewlen("abc",3); * * You can print the string with printf() as there is an implicit \0 at the * end of the string. However the string is binary safe and can contain * \0 characters in the middle, as the length is stored in the sds header. */ sds _sdsnewlen(constvoid *init, size_t initlen, int trymalloc) { void *sh; sds s; char type = sdsReqType(initlen); /* Empty strings are usually created in order to append. Use type 8 * since type 5 is not good at this. */ if (type == SDS_TYPE_5 && initlen == 0) type = SDS_TYPE_8; int hdrlen = sdsHdrSize(type); unsignedchar *fp; /* flags pointer. */ size_t usable;
/* Enlarge the free space at the end of the sds string so that the caller * is sure that after calling this function can overwrite up to addlen * bytes after the end of the string, plus one more byte for nul term. * If there's already sufficient free space, this function returns without any * action, if there isn't sufficient free space, it'll allocate what's missing, * and possibly more: * When greedy is 1, enlarge more than needed, to avoid need for future reallocs * on incremental growth. * When greedy is 0, enlarge just enough so that there's free space for 'addlen'. * * Note: this does not change the *length* of the sds string as returned * by sdslen(), but only the free buffer space we have. */ sds _sdsMakeRoomFor(sds s, size_t addlen, int greedy) { void *sh, *newsh; size_t avail = sdsavail(s); size_t len, newlen, reqlen; char type, oldtype = s[-1] & SDS_TYPE_MASK; int hdrlen; size_t usable;
/* Return ASAP if there is enough space left. */ if (avail >= addlen) return s;
len = sdslen(s); sh = (char*)s-sdsHdrSize(oldtype); reqlen = newlen = (len+addlen); assert(newlen > len); /* Catch size_t overflow */ if (greedy == 1) { if (newlen < SDS_MAX_PREALLOC) newlen *= 2; else newlen += SDS_MAX_PREALLOC; }
type = sdsReqType(newlen);
/* Don't use type 5: the user is appending to the string and type 5 is * not able to remember empty space, so sdsMakeRoomFor() must be called * at every appending operation. */ if (type == SDS_TYPE_5) type = SDS_TYPE_8;
hdrlen = sdsHdrSize(type); assert(hdrlen + newlen + 1 > reqlen); /* Catch size_t overflow */ if (oldtype==type) { newsh = s_realloc_usable(sh, hdrlen+newlen+1, &usable); if (newsh == NULL) returnNULL; s = (char*)newsh+hdrlen; } else { /* Since the header size changes, need to move the string forward, * and can't use realloc */ newsh = s_malloc_usable(hdrlen+newlen+1, &usable); if (newsh == NULL) returnNULL; memcpy((char*)newsh+hdrlen, s, len+1); s_free(sh); s = (char*)newsh+hdrlen; s[-1] = type; sdssetlen(s, len); } usable = usable-hdrlen-1; if (usable > sdsTypeMaxSize(type)) usable = sdsTypeMaxSize(type); sdssetalloc(s, usable); return s; }
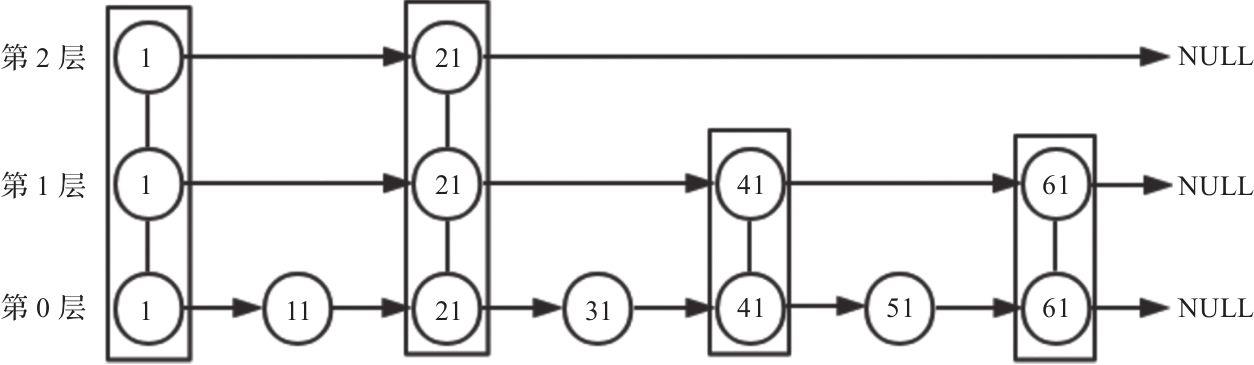
/* Insert a new node in the skiplist. Assumes the element does not already * exist (up to the caller to enforce that). The skiplist takes ownership * of the passed SDS string 'ele'. */ zskiplistNode *zslInsert(zskiplist *zsl, double score, sds ele) { zskiplistNode *update[ZSKIPLIST_MAXLEVEL], *x; unsignedlong rank[ZSKIPLIST_MAXLEVEL]; int i, level;
serverAssert(!isnan(score)); x = zsl->header; // 第一段for循环找到待插入节点在链表的位置 // 由于跳跃表有多层, 因此需要使用update数组记录每一层待插入的位置的指针 // rank数组记录了从头结点到update所在节点经历的节点数量, 用于在后续更新span的值, 即计算两个节点直接跨越了多少元素(等于两层rank的差值) for (i = zsl->level-1; i >= 0; i--) { // 逐层查找链表 // 每一层都横向遍历元素, 直到找到目标元素待插入的位置 // 注意: 当上一层不满足条件后, 进入下一层查找, 基于跳跃表的性质, 在下一层可能会继续前进若干元素, 而不可能出现越过位置的情况 // 因此每一层的rank至少是等于上一层的rank, 如果本层又向前移动了节点, 则本层的rank还需要继续增加越过节点的span值 /* store rank that is crossed to reach the insert position */ rank[i] = i == (zsl->level-1) ? 0 : rank[i+1];
while (x->level[i].forward && (x->level[i].forward->score < score || (x->level[i].forward->score == score && sdscmp(x->level[i].forward->ele,ele) < 0))) { // 如果当前查询节点小于插入节点, 则继续前进 rank[i] += x->level[i].span; x = x->level[i].forward; } update[i] = x; // update数组记录此时的元素指针, 用于后续更新 } /* we assume the element is not already inside, since we allow duplicated * scores, reinserting the same element should never happen since the * caller of zslInsert() should test in the hash table if the element is * already inside or not. */ level = zslRandomLevel(); // 按照概率得到一个当前待插入节点的高度 if (level > zsl->level) { // 如果随机高度大于当前的最大高度, 则更新头结点的对应层数上的指针, 使其 for (i = zsl->level; i < level; i++) { rank[i] = 0; update[i] = zsl->header; update[i]->level[i].span = zsl->length; // 新引入的层由于还未链接到待插入节点, 因此span默认初始化为链表的长度 } zsl->level = level; } x = zslCreateNode(level,score,ele); // 创建待插入节点, 核心逻辑与双向链表的插入并无区别, 仅存在多层需要多次处理而已 for (i = 0; i < level; i++) { x->level[i].forward = update[i]->level[i].forward; update[i]->level[i].forward = x;
/* update span covered by update[i] as x is inserted here */ // rank[0] x在第0层的前一节节点距离头节点的位置, 由于第0层是连续的, 因此实际就是在链表中的位置, 例如此时取值为20 // rank[i] x在第i层的前一个节点距离头节点的位置, 由于跳跃表的性质, 第i层可能会跳过一些节点直接链接x, 例如此时取值为15 // 两者相减, 即为第i层的前一个节点与x之间跨越的元素数量, 从而需要相应的更新前一个节点的span值, 并可计算出x在当前层数的span值 x->level[i].span = update[i]->level[i].span - (rank[0] - rank[i]); update[i]->level[i].span = (rank[0] - rank[i]) + 1; }
// 对于更高层, 由于x节点没有这么多层, 因此对于这些层来说, 跨越的节点数量+1 /* increment span for untouched levels */ for (i = level; i < zsl->level; i++) { update[i]->level[i].span++; }
* |00pppppp| - 1 byte
*      String value with length less than or equal to 63 bytes (6 bits).
*      "pppppp" represents the unsigned 6 bit length.
* |01pppppp|qqqqqqqq| - 2 bytes
*      String value with length less than or equal to 16383 bytes (14 bits).
*      IMPORTANT: The 14 bit number is stored in big endian.
* |10000000|qqqqqqqq|rrrrrrrr|ssssssss|tttttttt| - 5 bytes
*      String value with length greater than or equal to 16384 bytes.
*      Only the 4 bytes following the first byte represents the length
*      up to 2^32-1. The 6 lower bits of the first byte are not used and
*      are set to zero.
*      IMPORTANT: The 32 bit number is stored in big endian.
* |11000000| - 3 bytes
*      Integer encoded as int16_t (2 bytes).
* |11010000| - 5 bytes
*      Integer encoded as int32_t (4 bytes).
* |11100000| - 9 bytes
*      Integer encoded as int64_t (8 bytes).
* |11110000| - 4 bytes
*      Integer encoded as 24 bit signed (3 bytes).
* |11111110| - 2 bytes
*      Integer encoded as 8 bit signed (1 byte).
* |1111xxxx| - (with xxxx between 0001 and 1101) immediate 4 bit integer.
*      Unsigned integer from 0 to 12. The encoded value is actually from
*      1 to 13 because 0000 and 1111 can not be used, so 1 should be
*      subtracted from the encoded 4 bit value to obtain the right value.
* |11111111| - End of ziplist special entry.
typedefstructdictType { /* Callbacks */ uint64_t (*hashFunction)(constvoid *key); void *(*keyDup)(dict *d, constvoid *key); void *(*valDup)(dict *d, constvoid *obj); int (*keyCompare)(dict *d, constvoid *key1, constvoid *key2); void (*keyDestructor)(dict *d, void *key); void (*valDestructor)(dict *d, void *obj); int (*resizeAllowed)(size_t moreMem, double usedRatio); /* Invoked at the start of dict initialization/rehashing (old and new ht are already created) */ void (*rehashingStarted)(dict *d); /* Invoked at the end of dict initialization/rehashing of all the entries from old to new ht. Both ht still exists * and are cleaned up after this callback. */ void (*rehashingCompleted)(dict *d); /* Allow a dict to carry extra caller-defined metadata. The * extra memory is initialized to 0 when a dict is allocated. */ size_t (*dictMetadataBytes)(dict *d);
/* Data */ void *userdata;
/* Flags */ /* The 'no_value' flag, if set, indicates that values are not used, i.e. the * dict is a set. When this flag is set, it's not possible to access the * value of a dictEntry and it's also impossible to use dictSetKey(). Entry * metadata can also not be used. */ unsignedint no_value:1; /* If no_value = 1 and all keys are odd (LSB=1), setting keys_are_odd = 1 * enables one more optimization: to store a key without an allocated * dictEntry. */ unsignedint keys_are_odd:1; /* TODO: Add a 'keys_are_even' flag and use a similar optimization if that * flag is set. */ } dictType;
/* Resize or create the hash table, * when malloc_failed is non-NULL, it'll avoid panic if malloc fails (in which case it'll be set to 1). * Returns DICT_OK if resize was performed, and DICT_ERR if skipped. */ int _dictResize(dict *d, unsignedlong size, int* malloc_failed) { if (malloc_failed) *malloc_failed = 0;
/* We can't rehash twice if rehashing is ongoing. */ assert(!dictIsRehashing(d));
/* Rehashing to the same table size is not useful. */ if (new_ht_size_exp == d->ht_size_exp[0]) return DICT_ERR;
/* Allocate the new hash table and initialize all pointers to NULL */ // 根据给定的是否允许失败参数, 尝试分配内存 if (malloc_failed) { new_ht_table = ztrycalloc(newsize*sizeof(dictEntry*)); *malloc_failed = new_ht_table == NULL; if (*malloc_failed) return DICT_ERR; } else new_ht_table = zcalloc(newsize*sizeof(dictEntry*));
new_ht_used = 0;
/* Prepare a second hash table for incremental rehashing. * We do this even for the first initialization, so that we can trigger the * rehashingStarted more conveniently, we will clean it up right after. */ // 给新的哈希表初始化参数 d->ht_size_exp[1] = new_ht_size_exp; d->ht_used[1] = new_ht_used; d->ht_table[1] = new_ht_table; d->rehashidx = 0; if (d->type->rehashingStarted) d->type->rehashingStarted(d);
/* Is this the first initialization or is the first hash table empty? If so * it's not really a rehashing, we can just set the first hash table so that * it can accept keys. */ // 检查旧哈希表状态, 如果已经全部迁移完成, 则重置旧哈希表的指针指向新的哈希表 if (d->ht_table[0] == NULL || d->ht_used[0] == 0) { if (d->type->rehashingCompleted) d->type->rehashingCompleted(d); if (d->ht_table[0]) zfree(d->ht_table[0]); d->ht_size_exp[0] = new_ht_size_exp; d->ht_used[0] = new_ht_used; d->ht_table[0] = new_ht_table; _dictReset(d, 1); d->rehashidx = -1; return DICT_OK; }
/* Helper function for `dictRehash` and `dictBucketRehash` which rehashes all the keys * in a bucket at index `idx` from the old to the new hash HT. */ // 尝试移动一个元素 staticvoidrehashEntriesInBucketAtIndex(dict *d, uint64_t idx) { dictEntry *de = d->ht_table[0][idx]; uint64_t h; dictEntry *nextde; while (de) { nextde = dictGetNext(de); void *key = dictGetKey(de); /* Get the index in the new hash table */ if (d->ht_size_exp[1] > d->ht_size_exp[0]) { // 如果是扩容, 则重新计算一次哈希值 h = dictHashKey(d, key) & DICTHT_SIZE_MASK(d->ht_size_exp[1]); } else { /* We're shrinking the table. The tables sizes are powers of * two, so we simply mask the bucket index in the larger table * to get the bucket index in the smaller table. */ // 如果是缩容, 则使用掩码遮盖高位bit即可 h = idx & DICTHT_SIZE_MASK(d->ht_size_exp[1]); } if (d->type->no_value) { if (d->type->keys_are_odd && !d->ht_table[1][h]) { /* Destination bucket is empty and we can store the key * directly without an allocated entry. Free the old entry * if it's an allocated entry. * * TODO: Add a flag 'keys_are_even' and if set, we can use * this optimization for these dicts too. We can set the LSB * bit when stored as a dict entry and clear it again when * we need the key back. */ assert(entryIsKey(key)); if (!entryIsKey(de)) zfree(decodeMaskedPtr(de)); de = key; } elseif (entryIsKey(de)) { /* We don't have an allocated entry but we need one. */ de = createEntryNoValue(key, d->ht_table[1][h]); } else { /* Just move the existing entry to the destination table and * update the 'next' field. */ assert(entryIsNoValue(de)); dictSetNext(de, d->ht_table[1][h]); } } else { // 此函数设置de的next指针, 使得de变量链接到现有链表的头部. // 如果当前位置本来就没有元素, 则此操作也等于什么都不做 dictSetNext(de, d->ht_table[1][h]); } d->ht_table[1][h] = de; // 在对应的位置写入de, 使得de变为头结点 d->ht_used[0]--; d->ht_used[1]++; de = nextde; } d->ht_table[0][idx] = NULL; }
/* Performs N steps of incremental rehashing. Returns 1 if there are still * keys to move from the old to the new hash table, otherwise 0 is returned. * * Note that a rehashing step consists in moving a bucket (that may have more * than one key as we use chaining) from the old to the new hash table, however * since part of the hash table may be composed of empty spaces, it is not * guaranteed that this function will rehash even a single bucket, since it * will visit at max N*10 empty buckets in total, otherwise the amount of * work it does would be unbound and the function may block for a long time. */ intdictRehash(dict *d, int n) { int empty_visits = n*10; /* Max number of empty buckets to visit. */ // 获取新旧两个哈希表的容量 unsignedlong s0 = DICTHT_SIZE(d->ht_size_exp[0]); unsignedlong s1 = DICTHT_SIZE(d->ht_size_exp[1]); // dict_can_resize是一个全局变量, Redis在进行备份时, 由于使用copy-on-write机制, 为了避免产生太多的内存移动, 此时会全局禁用哈希表的迁移操作 if (dict_can_resize == DICT_RESIZE_FORBID || !dictIsRehashing(d)) return0; /* If dict_can_resize is DICT_RESIZE_AVOID, we want to avoid rehashing. * - If expanding, the threshold is dict_force_resize_ratio which is 4. * - If shrinking, the threshold is 1 / (HASHTABLE_MIN_FILL * dict_force_resize_ratio) which is 1/32. */ // 如果当前是 DICT_RESIZE_AVOID, 则扩容和缩容的要求更加严格, 从而减少Rehash的概率 if (dict_can_resize == DICT_RESIZE_AVOID && ((s1 > s0 && s1 < dict_force_resize_ratio * s0) || (s1 < s0 && s0 < HASHTABLE_MIN_FILL * dict_force_resize_ratio * s1))) { return0; }
while(n-- && d->ht_used[0] != 0) { /* Note that rehashidx can't overflow as we are sure there are more * elements because ht[0].used != 0 */ assert(DICTHT_SIZE(d->ht_size_exp[0]) > (unsignedlong)d->rehashidx); while(d->ht_table[0][d->rehashidx] == NULL) { // rehashidx 除了用于记录当前是否正在rehash以外, 还用于记录当前rehash的进度, 当其等于旧哈希表容量时表明已经完成迁移 d->rehashidx++; if (--empty_visits == 0) return1; } /* Move all the keys in this bucket from the old to the new hash HT */ rehashEntriesInBucketAtIndex(d, d->rehashidx); d->rehashidx++; }